Latex 备忘录 
约 3620 个字 199 行代码 预计阅读时间 17 分钟
环境与配置 
TexLive | windows 的 LaTeX环境 
Texlive 安装 
Installing TeX Live over the Internet - TeX Users Group (tug.org)
在进入安装界面前,可以选择镜像源
安装 texworks 前端可以不选
texlive 安装比较慢,需要耐心等待
安装后,搜索“查看高级系统设置”,修改环境变量,将 texlive 安装目录下的bin/windows目录加入到系统环境变量中
然后在 cmd 中输入tex -v,如果出现版本号,说明安装成功
tex -v
latex -v
xelatex -v
bibtex -v

Texstudio 下载 
Releases · texstudio-org/texstudio
-
将语言设置为中文。依次选择 Opitions->Configure TeXstudio
-
修改中文界面后,我们可以选择左侧命令设置不同编译器,外部 PDF 查看器,和参看文献的执行程序。点击 1 处,可以将上述提到的 3,4,5 等的路径设置为 TeXlive 安装路径下对应的 exe 执行程序。点击 2 处,就可恢复默认。

- 默认编译器、默认 PDF 查看器、默认文献工具等设置;点击构建选项,可以修改默认编译器、PDF 查看器和默认文献工具等。若写中文论文,则需修改默认编译器为 XelaTeX. 若为英文,则用 PdfLaTex。

- 设置默认字体编码和添加行号:点击编辑器选项,一般默认字体编码为 UTF-8(一般不修改
) 。显示行号默认:所有行号。添加行号,可以快速定位某个词或句的位置。此外,当程序报错时,可快速定位到出错位置,方便修改。
\documentclass{article}
\usepackage{amsmath}

\begin{document}

\title{TeX Live Configuration Test}
\author{Your Name}
\date{\today}

\maketitle

\section{Introduction}
This is a simple document to test if TeX Live is configured correctly.

\section{Mathematics}
Here is a simple mathematical equation:
\begin{equation}
    E = mc^2
\end{equation}

\section{Conclusion}
If you can see this document with the title, sections, and the equation above, then your TeX Live installation is working correctly.

\end{document}
编译后显示下面的页面,说明编译成功

参考文献编译
在设置页面,选择 bibtex 为默认

对于 texstudio 来说,应该是 F6+F8+F6+F6
LaTeX + Latex Workshop + VScode
下载Latex Workshop插件。
按ctrl+,进入设置,点击右上角的“白纸”图标,选择setting.json。
在setting.json中加入以下语句
添加完成后,重新启动 VScode。
// LATEX settings
"editor.minimap.enabled": true,
"latex-workshop.latex.tools": [
    {
        "name": "pdflatex",
        "command": "pdflatex",
        "args": [
            "-synctex=1",
            "-interaction=nonstopmode",
            "-file-line-error",
            "%DOCFILE%"
        ]
    },
    {
        "name": "xelatex",
        "command": "xelatex",
        "args": [
            "-synctex=1",
            "-interaction=nonstopmode",
            "-file-line-error",
            "%DOCFILE%"
        ]
    },
    {
        "name": "bibtex",
        "command": "bibtex",
        "args": [
            "%DOCFILE%"
        ]
    }
],
"latex-workshop.latex.recipes": [
    {
        "name": "xelatex",
        "tools": [
            "xelatex"
        ],
    },
    {
        "name": "pdflatex",
        "tools": [
            "pdflatex"
        ]
    },
    {
        "name": "xe->bib->xe->xe",
        "tools": [
            "xelatex",
            "bibtex",
            "xelatex",
            "xelatex"
        ]
    },
    {
        "name": "pdf->bib->pdf->pdf",
        "tools": [
            "pdflatex",
            "bibtex",
            "pdflatex",
            "pdflatex"
        ]
    }
],
"latex-workshop.latex.clean.fileTypes": [
    "*.aux",
    "*.bbl",
    "*.blg",
    "*.idx",
    "*.ind",
    "*.lof",
    "*.lot",
    "*.out",
    "*.toc",
    "*.acn",
    "*.acr",
    "*.alg",
    "*.glg",
    "*.glo",
    "*.gls",
    "*.ist",
    "*.fls",
    "*.log",
    "*.fdb_latexmk"
],
//tex文件浏览器,可选项为"none" "browser" "tab" "external"
"latex-workshop.view.pdf.viewer": "tab",
//自动编译tex文件
"latex-workshop.latex.autoBuild.run": "onFileChange",
//显示内容菜单:(1)编译文件;(2)定位游标
"latex-workshop.showContextMenu": true,
//显示错误
"latex-workshop.message.error.show": false,
//弹窗显示警告
"latex-workshop.message.warning.show": false,
//从使用的包中自动补全命令和环境
"latex-workshop.intellisense.package.enabled": true,
//设置为never,为不清除辅助文件
"latex-workshop.latex.autoClean.run": "never",
//设置vscode编译tex文档时的默认编译链
"latex-workshop.latex.recipe.default": "lastUsed",
// 用于反向同步的内部查看器的键绑定。ctrl/cmd +点击(默认)或双击
// ctrl-click 代表 ctrl + 左键单击
// double-click 代表左键双击反向定位
"latex-workshop.view.pdf.internal.synctex.keybinding": "double-click",
正向定位
"latex-workshop.view.pdf.internal.synctex.keybinding": "double-click",
反向定位
在 VS Code 中选择 快捷键设置 (Keyboard ShortcutsSyncTeX from cursor ”`,将对应的快捷键改成你想要的组合,保存之后就可以通过快捷键组合实现反向搜索。
论文神器 VS Code + LaTex + LaTex Workshop VS Code Latex 极为简单方便的正反向定位解决办法
点击左侧的编译和查看 pdf,就可以啦 ~

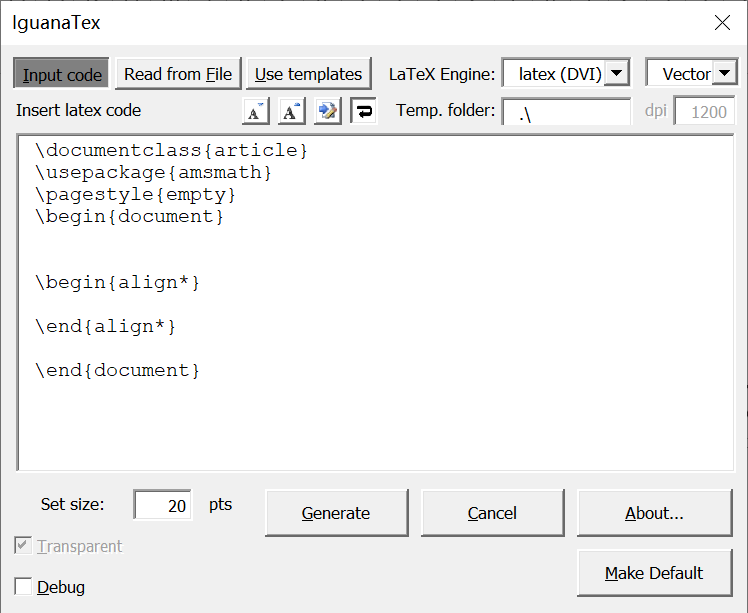
IguanaTex | LaTeX in PPT
假设已经安装好了 Texlive
IguanaTex - A Free Latex Add-In for PowerPoint on Windows and Mac (jonathanleroux.org)
注意设置好路径
GhostScript and ImageMagick
required to use pdflatex/xelatex/lualatex.
-
Install and set path to GhostScript and ImageMagick:
-
Set the full path to
gswin32c.exeorgswin64c.exe(note the "c"!) and to ImageMagick's magick.exe in the "Main Settings" window. - Best way to make sure the path is correct is to use the "…" button next to each path and navigate to the correct file.
- Some default paths include
%USERPROFILE%. It is recommended to click on "…" to make sure the path gets properly converted to the actual user profile path.
TeX2img(SVG)
(Optional): TeX2img, used for vector graphics output via EMF (Download). Note that vector graphics output via SVG is now recommended if you have Office 2019 or 365.
- Only needed for vector graphics support via EMF (compared to SVG, pros: available on all PowerPoint versions, fully modifiable shapes; cons: some displays randomly suffer from distortions)
- Download from this link (more details on TeX2img on their Github repo)
- After unpacking TeX2img somewhere on your machine, run TeX2img.exe once to let it automatically set the various paths to latex/ghostscript, then set the full path to
TeX2imgc.exe(note the "c"!) in the "Main Settings" window.
中文公式输入错误

\documentclass{article}
\usepackage{amsmath}
\pagestyle{empty}

\begin{document}
\begin{align*}

\end{align*}
\end{document}
paste image —— 图片插入助手 
这个插件可以使用快捷键插入图片,免去了写 htbp 等的麻烦,还可以插入到指定路径下。
根路径不是 report 文件夹怎么办
Overleaf | 边学边用的使用指南 
最早是看到 98 上发的有关 latex 的帖子,说可以快速高效地写实验报告。也从雪松前辈发的模版中学习到一些 latex 排版的基础知识。再加上去年《数学软件》短学期老妖的一些小作业的磨炼,可以说对 latex 的基本用法有了浅薄的了解。这个学期的所有课程作业报告和论文就没有使用过 word 了(真香啊
趁手的工具才是最好的工具
为什么要写这一个章节
众所周知,大学中有很多课程都需要写实验报告 / 解题报告 / 小作业报告 / 论文等等,除却写作内容,排版也是非常令人头疼的一部分。常用的排版工具有两大类,一类是以 word 为代表的“所见即所得”式,另一类是像 latex 这样子的“所想即所得”的编程式排版。
发现身边有很多朋友并不是非常会排版,或者是排版会花费很多时间。而在现行的评价体系下,在内容质量大致相似的情况下,图文并茂,排版整洁的作业印象分一定会高不少。笔者 latex 水平不高,目的就是想要快点把实验报告写掉
这一个章节面向 0 latex 基础小白,使用overleaf平台,希望实现的效果是基本掌握后,只用 15-20min 就能完成日常论文 / 实验报告作业的排版。
- 复用性高,所有设置都比较明晰
- 只要做一个称心如意的模版,便可以专注于内容本身,而将麻烦的排版交给编译器
- 无敌的公式体验:公式编辑较 word 方便和美观太多
- 公式、图表、参考文献都可以自动标号
- 云端自动保存、不怕写了半天的论文突然消失
- 不用进行包管理、环境配置简单、打开网址就可以用
- 有很多模版供使用
这里分享 4 个我自己魔改的模版,基本上覆盖到了大部分的日常学习场景。


- Template1:日常课程小作业
- Template2:中文课程论文
- Template3:实验报告 按照嵌入式系统等一些课程给的 word 模版改编
- Template4:实验报告 这一个是笔者使用频率最高的模版。
使用模版的时候,点击复制按钮,将模版复制一份使用!
在进行排版之前,你至少需要以下:
- 文本
- 插入的图片(最好可以按照一定的顺序保存在某个文件夹中,并命好名)
- 参考文献(
bibtex版本) :可以直接从cnki中导出或者使用endnote或者zotero等工具
如果上面都没有,你想要边写边排也是可以的

工具栏与快捷键 
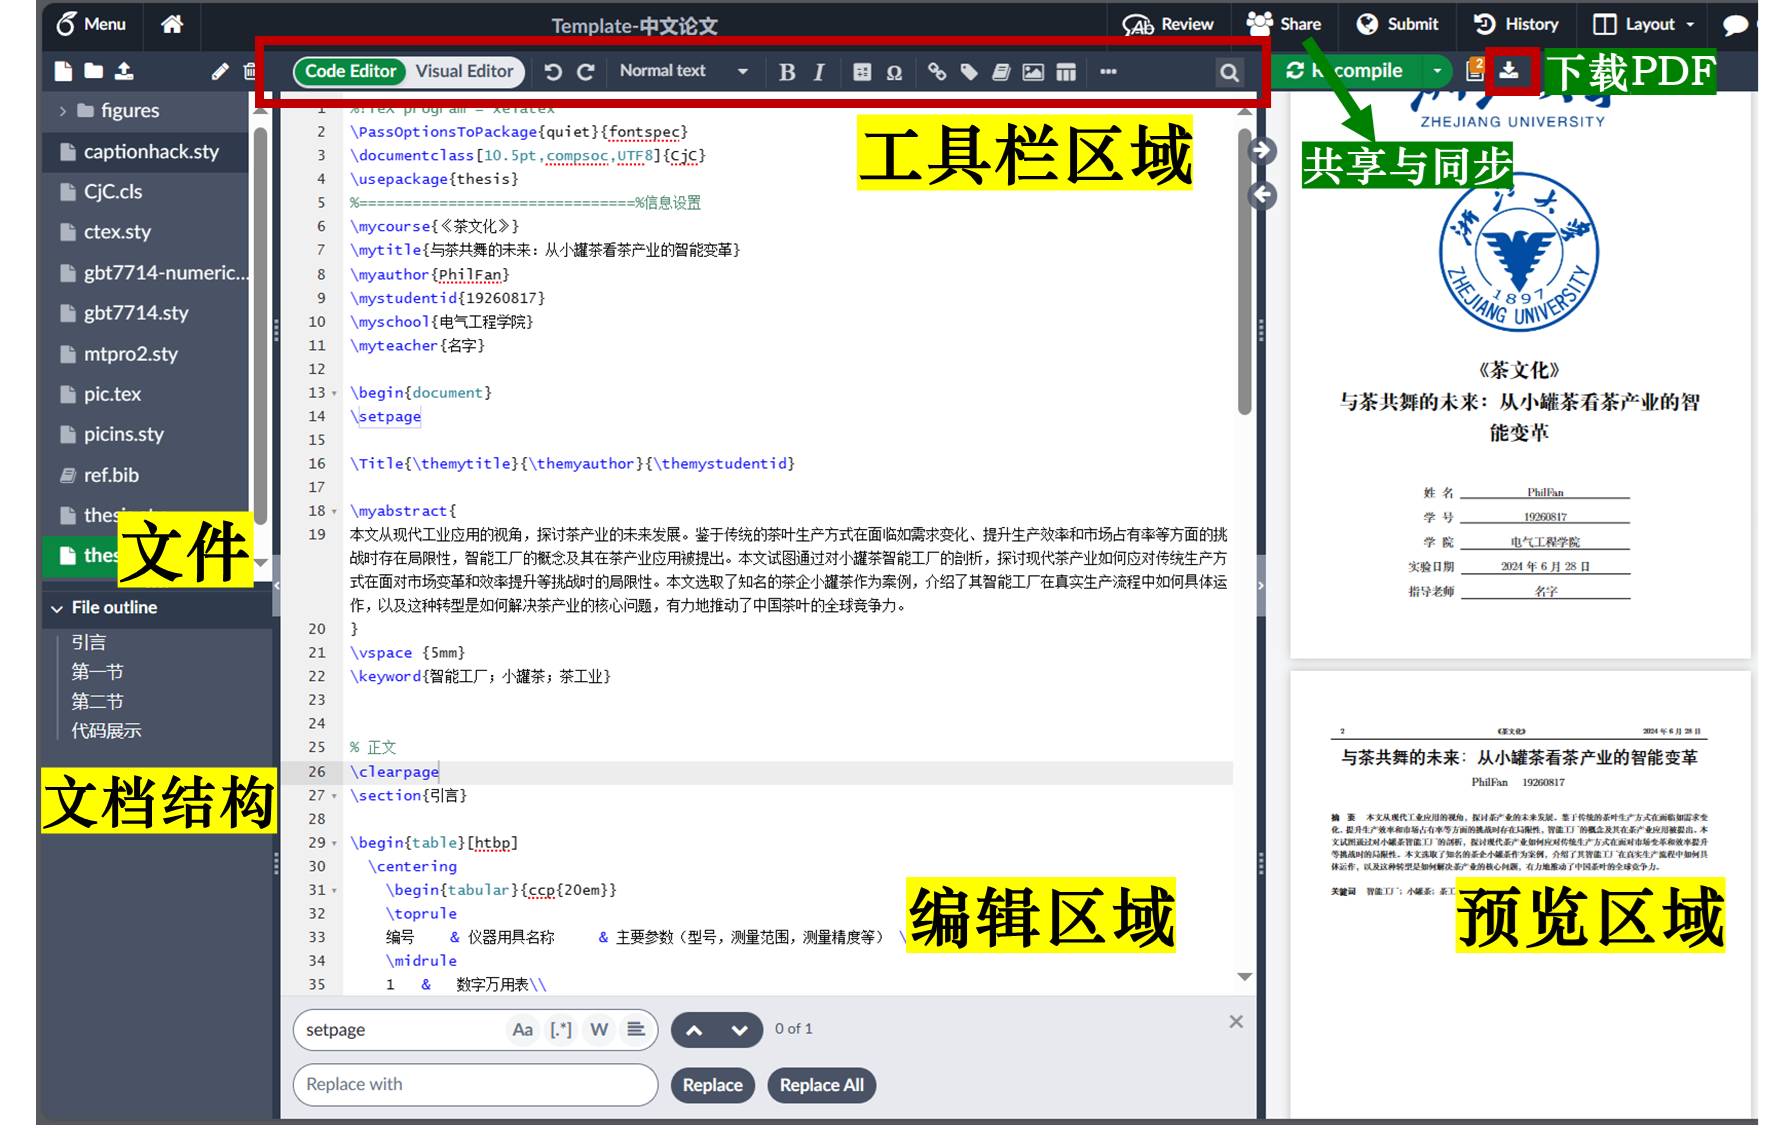
首先来认识一下工具栏,这里标出了常见的功能。其中中文论文使用的比较多的可能是多级标题、图片、表格、文献。
如果你还是一头雾水,不要着急,慢慢拆分一个个讲解

ctrl+B: 加粗
ctrl+/: 注释,latex 中的注释是以%开头的,
% 我是一行注释
\section{} %我是一句注释
个人信息 
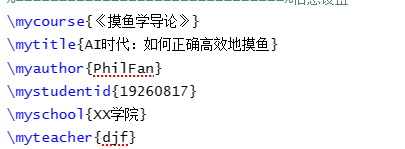
先填好自己的个人信息,包括姓名、学号

标题与小标题 
一般不建议使用 3-4 甚至更高的标题
\section{} % 我是一级标题
\subsection{} % 我是二级标题
\subsubsection{} % 我是三级标题
表格 
- latex 表格比较麻烦,一种简单快捷的方式是使用其他软件(excel、tableau)直接生成表格,另存为图片格式复制进 latex 中(最简单省时)
- 如果你还是想在 latex 中打表格
,推荐一个网站 Create LaTeX tables online – TablesGenerator.com,在 excel 中打好之后。复制到这个网站中,点击
generate,把生成的代码复制进编辑区域有时候会遇到一些奇怪的问题
- 还可以使用
excel2latex等 excel 的插件,不过感觉使用体验没有第二种方法好。

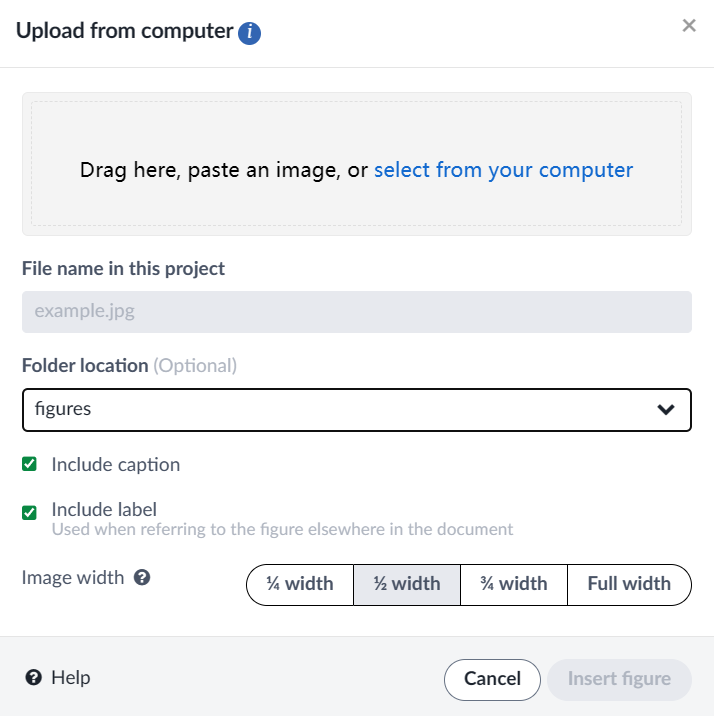
图片怎么插入 
- 方法一:点击工具栏里边的图片按钮
- 方法二:直接在编辑窗口粘贴你想要的图片

插入之后编辑区域就会出现这样的代码
\begin{figure}[htbp]
    \centering
    \includegraphics[width=0.5\linewidth]{figures/example.png} % 数字表示放缩比例
    \caption{Enter Caption} % 图片标题
    \label{fig:enter-label} % 图片tag,用于交叉引用
\end{figure}
注意!!!
- 如图,
folder location请放在figures这个文件夹下,你可以在左侧的列表中看到。 - 请在
\begin{figure}后边加上[htbp]!
如何插入并排的图片
使用下面的代码,把example位置替换为想插入的图片的路径即可。
同样的,这里的数字代表放缩的比例,可以修改一下看看会发生什么。
\begin{figure}[!htbp]
    \centering
    \begin{minipage}[b]{0.45\linewidth}
        \centering
        \includegraphics[width=0.9\textwidth]{example}
        \caption{非子图并排题注1}
    \end{minipage}%
    \begin{minipage}[b]{0.45\linewidth}
        \centering
        \includegraphics[width=0.9\textwidth]{example}
        \caption{非子图并排题注2}
    \end{minipage}
\end{figure}
如何插入 2x2,3 个并排或者其他类型
在pic.tex文件中,由多种图片展示形式,选择你想要的形式,将代码复制到主文件下,把\includegraphics[width=0.5\linewidth]{figures/example.png}这一行改成你想要的图片的路径。
参考文献如何设置 
latex中的参考文献是使用bibtex,什么意思呢?就是要用类似下面的语句来声明一个你要引用的文献
@book{14,
  title={新时代的中国绿色发展},
  author={{中华人民共和国国务院新闻办公室}},
  publisher={人民出版社},
  year={2023},
  address={北京}
}
这种格式如何获取呢?


你已经有了一版参考文献的列表,但是你懒得一个一个去知网找了;打开任意一个大模型,输入你的参考文献的列表,说 " 请把上边的参考文献改写成为 bibtex 的格式 "
获取之后,请把对应的代码放在ref.bib文件下,这个代码中的number1可以改成任何你记得住的数字或者字符,相当于给这个参考文献一个名字。
@book{number1,
  title={新时代的中国绿色发展},
  author={{中华人民共和国国务院新闻办公室}},
  publisher={人民出版社},
  year={2023},
  address={北京}
}
在文中如何引用呢?
在准备好上面的文献列表以后,在文中想要插入引用文献的地方打\cite{xxx}命令,xxx 就是你刚才给文献取的名字。
交叉引用 
你的论文或许有这样的片段——“如图 1 所示” “由表 1 可知”
但是如果你的图片不止一张,或者你在这张图片前面又加了一张图片,那顺序不就乱了吗?难道还要一个一个手动编号吗!!!?
当然不用!
聪明的你可能注意到了,在刚才图片或者表格的代码当中,有一行是label,这一行的名字就相当于图片的 tag。
\begin{figure}[htbp]
    \centering
    \includegraphics[width=0.5\linewidth]{figures/example.png} % 数字表示放缩比例
    \caption{Enter Caption} % 图片标题
    \label{xxxx} % 图片tag,用于交叉引用
\end{figure}
如图1所示——就可以改写成如图\ref{xxxx}所示,其中xxxx是你要交叉引用的对象的 label
公式 
这点应该是 latex 的强项了 可以依照参考文献中的资料,自己学习一下相关语法
遇到不会的上网搜索一下,应该问题不大。
推荐一个小工具 https://www.latexlive.com/
共享与同步 
点击右上角的share按钮,就可以打开共享链接,分为两种权限——只读和可编辑。发给同伴以后就可以一起编辑了。

其他 
至此,你已经可以使用上面的功能去编辑一篇有模有样的论文了。快去试试吧!
要记住的是,使用一种新的工具,遇到问题是很正常的事情。遇到问题先自行排查问题原因,搜索解决方案,这也是学习 latex 的很好途径。
如果遇到了解决不了的问题,先上网搜有没有相似的问题,再问问 GPT。也可以在 98 上发帖求助,但先看一下提问的智慧和别像弱智一样提问这两篇文章
拓展阅读 & 98 资源整合 
感谢各位前辈的分享!
排版 
字号与字体 
设置字体大小的基本尺寸为 10pt,11pt 和 12pt,其中默认为 10pt
\documentclass[12pt]{article}
| 声明 | 对应字号 |
|---|---|
\tiny |
5pt |
\scriptsize |
7pt |
\footnotesize |
8pt |
\small |
9pt |
\normalsize |
10pt |
\large |
12pt |
\Large |
14.4pt |
\LARGE |
17.28pt |
\huge |
20.74pt |
\Huge |
24.88pt |
对齐 
\leftline{尊敬的各位老师}     %左对齐
\rightline{书略陈固陋,勿劳赐复}    %右对齐
\centering	%居中
首行不能缩进
\usepackage{indentfirst}
\setlength{\parindent}{2em} % 控制首行缩进
在 ctexart 类型文章中,标题 section 标题是居中的,现需要改为左对齐,需要设置如下。转自:Latex 标题左对齐
\documentclass[UTF8]{ctexart}

\CTEXsetup[format={\Large\bfseries}]{section}

\title{题目}
换行换页 
\newline

\newpage
\clearpage
解决英文断字重排的问题
\hyphenpenalty=5000
\tolerance=1000
也可以手动指定。
\hyphenation{hy-phen-a-tion}
图片位置 
[htbp]
缩小放大
公式与符号 
希腊符号 
| LaTeX 代码 | 希腊字母 | LaTeX 代码 | 希腊字母 |
|---|---|---|---|
\alpha |
\(\alpha\) | \Alpha |
\(\Alpha\) |
\beta |
\(\beta\) | \Beta |
\(\Beta\) |
\gamma |
\(\gamma\) | \Gamma |
\(\Gamma\) |
\delta |
\(\delta\) | \Delta |
\(\Delta\) |
\epsilon |
\(\epsilon\) | \Epsilon |
\(\Epsilon\) |
\zeta |
\(\zeta\) | \Zeta |
\(\Zeta\) |
\eta |
\(\eta\) | \Eta |
\(\Eta\) |
\theta |
\(\theta\) | \Theta |
\(\Theta\) |
\iota |
\(\iota\) | \Iota |
\(\Iota\) |
\kappa |
\(\kappa\) | \Kappa |
\(\Kappa\) |
\lambda |
\(\lambda\) | \Lambda |
\(\Lambda\) |
\mu |
\(\mu\) | \Mu |
\(\Mu\) |
\nu |
\(\nu\) | \Nu |
\(\Nu\) |
\xi |
\(\xi\) | \Xi |
\(\Xi\) |
\omicron |
\(\omicron\) | \Omicron |
\(\Omicron\) |
\pi |
\(\pi\) | \Pi |
\(\Pi\) |
\rho |
\(\rho\) | \Rho |
\(\Rho\) |
\sigma |
\(\sigma\) | \Sigma |
\(\Sigma\) |
\tau |
\(\tau\) | \Tau |
\(\Tau\) |
\upsilon |
\(\upsilon\) | \Upsilon |
\(\Upsilon\) |
\phi |
\(\phi\) | \Phi |
\(\Phi\) |
\chi |
\(\chi\) | \Chi |
\(\Chi\) |
\psi |
\(\psi\) | \Psi |
\(\Psi\) |
\omega |
\(\omega\) | \Omega |
\(\Omega\) |
计算符号 
| LaTeX 代码 | 运算符号 | LaTeX 代码 | 运算符号 |
|---|---|---|---|
+ |
\(+\) | - |
\(-\) |
\times |
\(\times\) | \cdot |
\(\cdot\) |
\div |
\(\div\) | \sqrt{x} |
\(\sqrt{x}\) |
\pm |
\(\pm\) | ^\circ |
\(^\circ\) |
\oplus |
\(\oplus\) | \sum |
\(\sum\) |
\int |
\(\int\) | ||
> |
\(>\) | ||
< |
\(<\) | \neq |
\(\neq\) |
= |
\(=\) | \equiv |
\(\equiv\) |
\approx |
\(\approx\) | \in |
\(\in\) |
箭头 
\uparrow |
\(\uparrow\) |
\downarrow |
\(\downarrow\) |
\Uparrow |
\(\Uparrow\) |
\Downarrow |
\(\Downarrow\) |
\updownarrow |
\(\updownarrow\) |
\Updownarrow |
\(\Updownarrow\) |
\rightarrow |
\(\rightarrow\) |
\Longrightarrow |
\(\Longrightarrow\) |
\Longleftarrow |
\(\Longleftarrow\) |
\rightleftharpoons |
\(\rightleftharpoons\) |
\nLeftarrow |
\(\nLeftarrow\) |
\nRightarrow |
\(\nRightarrow\) |
X\stackrel{F}{\longrightarrow}Y |
\(X\stackrel{F}{\longrightarrow}Y\) |
括号 
| LaTeX 代码 | 括号类型 | 例子 |
|---|---|---|
() |
小括号 | \left( x \right) 表示 \((x)\) |
[] |
中括号 | \left[ x \right] 表示 \([x]\) |
{} |
大括号 | \left\{ x \right\} 表示 \(\{x\}\) |
|| |
绝对值符号 | \left| x \right| 表示 $ |
\lfloor x \rfloor |
取整符号(向下取整) | \lfloor x \rfloor 表示 \(\lfloor x \rfloor\) |
\lceil x \rceil |
取整符号(向上取整) | \lceil x \rceil 表示 \(\lceil x \rceil\) |
\langle x \rangle |
尖括号 | \langle x \rangle 表示 \(\langle x \rangle\) |
\rangle |
右尖括号 | \rangle 表示 \(\rangle\) |
大括号最重要的代码段是
\left\{
	\begin{}
	···
	\end{}
\right.
\left\{
             \begin{array}{**lr**}
             x=\dfrac{3\pi}{2}(1+2t)\cos(\dfrac{3\pi}{2}(1+2t)), &  \\
             y=s, & 0\leq s\leq L,|t|\leq1.\\
             z=\dfrac{3\pi}{2}(1+2t)\sin(\dfrac{3\pi}{2}(1+2t)), &
             \end{array}
\right.
\begin{gathered}
\begin{matrix} 0 & 1 \\ 1 & 0 \end{matrix}
\quad
\begin{pmatrix} 0 & -i \\ i & 0 \end{pmatrix}
\quad
\begin{bmatrix} 0 & -1 \\ 1 & 0 \end{bmatrix}
\quad
\begin{Bmatrix} 1 & 0 \\ 0 & -1 \end{Bmatrix}
\quad
\begin{vmatrix} a & b \\ c & d \end{vmatrix}
\quad
\begin{Vmatrix} i & 0 \\ 0 & -i \end{Vmatrix}
\end{gathered}
矩阵与向量 
| vec{} | \(\vec{a}\) |
| mathbf | \(\mathbf{A}\) |
| boldsymbol{} | \(\boldsymbol{A}\) |
标注 
加 ^ 号 输入\hat 或 \widehat |
\(\hat{A}\) \(\widehat{A}\) |
加横线 输入 \overline |
\(\overline{A}\) |
加波浪线 输入\widetilde |
\(\widetilde{A}\) |
加一个点\dot加两个点\ddot |
\(\dot{A},\ddot{A}\) |
字母正下方加文字
\mathop{expr1}\limits_{expr2}^{expr3}
\(\mathop{expr1}\limits_{expr2}^{expr3}\)
\(\sum\limits_{i=0}^n {x_i}\)
limits命令必需加在数学符号后边,所以使用\mathop{}包裹
\(f_3(d) = \mathop{max}\limits_{x_3}(2x_3 + f_4(d-x_3))\)

