Raspberry Pi
约 752 个字 80 行代码 预计阅读时间 4 分钟
系统烧录 
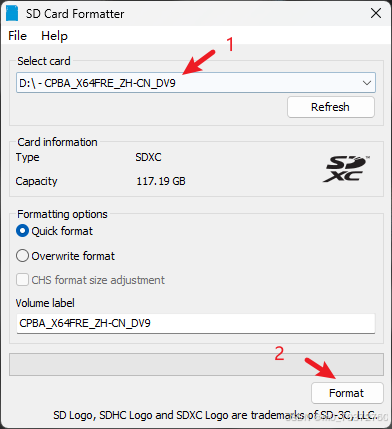
sd 卡格式化 SD Memory Card Formatter for Windows Download | SD Association
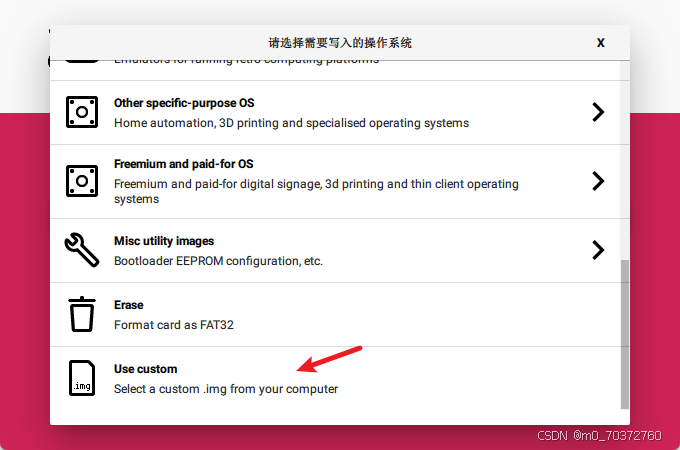
利用烧录工具 Raspberry Pi Imager 下载烧录 Ubuntu 20.04 镜像系统,步骤如下:
 点击选择操作系统,下拉到最下面,选择自己下载的系统镜像
树莓派 4B 安装 Ubuntu20.04 桌面(详细教程)_ 树莓派 4b ubuntu-CSDN 博客
20.04 只有 server 版本,没有 desktop 版本,但是 cli 界面 + 校网简直无敌,所以还是选择了 mate
烧录的镜像应该是像这样的压缩包一样的,不要烧录 iso,
ubuntu-mate-20.04-beta1-desktop-arm64+raspi.img.xz
Ubuntu MATE Releases - /20.04/
硬件 
风扇 
显示屏 
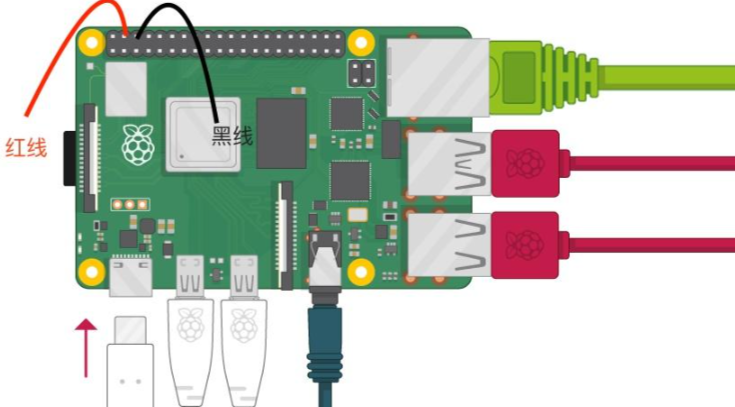
如果显示屏黑屏的话,考虑电压是不是太低了,电压过低会驱动不了显示屏
摄像头 
树莓派 4B 摄像头的详细使用教程(拍照 + 录像 + 监控)_ 树莓派拍照 -CSDN 博客
python - 避免 `can't open camera by index`,用 cv2 测试时,所有 cam 都连接 _Stack Overflow 中文网
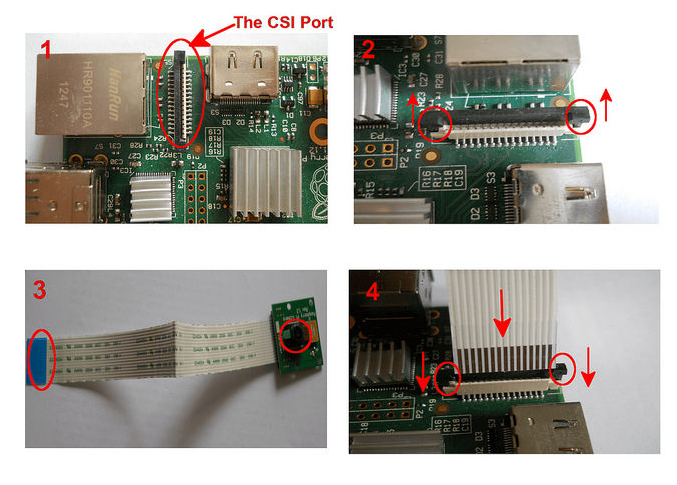
摄像头连接方法
sudo apt-get install -y raspi-config
raspi-config
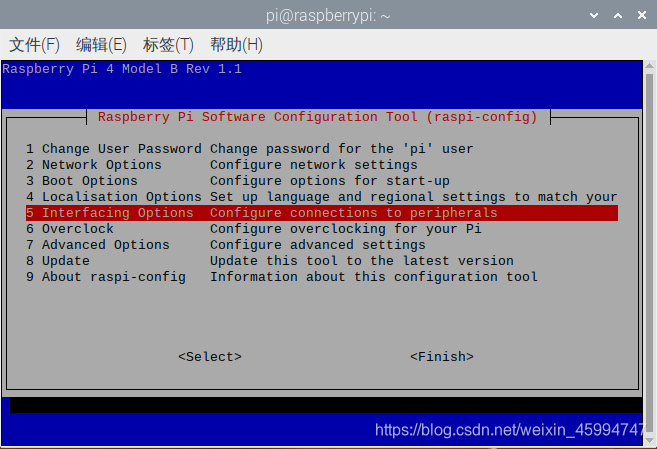
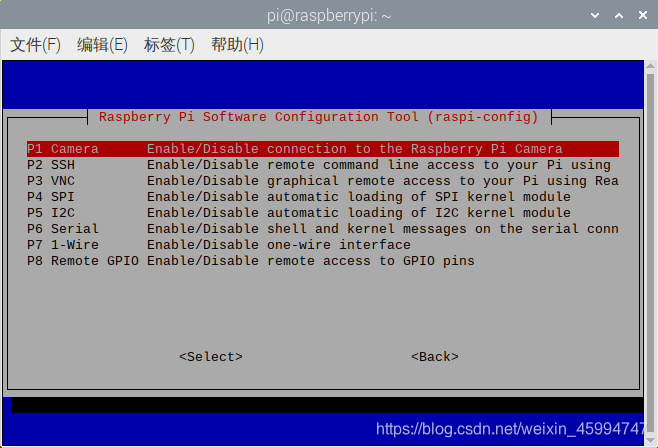
重启电脑reboot
sudo apt install v4l-utils

v4l2-ctl --list-devices
sudo vim /boot/config
config开头的文件,再最后一行加入与相机对应的代码
dtoverlay=ov5647
| Camera Module | In /boot/config.txt |
|---|---|
| V1 camera (OV5647) | dtoverlay=ov5647 |
| V2 camera (IMX219) | dtoverlay=imx219 |
| HQ camera (IMX477) | dtoverlay=imx477 |
| IMX290 and IMX327 | dtoverlay=imx290,clock-frequency=74250000 or dtoverlay=imx290,clock-frequency=37125000 (both modules share the imx290 kernel driver, please refer to instructions from the module vendor for the correct frequency) |
| IMX378 | dtoverlay=imx378 |
| OV9281 | dtoverlay=ov9281 |
自带 
raspistill -o a.jpg -t 1000
这行命令的作用是在一秒钟的延迟之后,拍下一张名为 a.jpg 的照片,保存在树莓派的主目录下。-t 的延迟选项后的参数是以毫秒为单位,1000 便表示 1 秒。延时选项在输入命令时可以不加,但 -o 后的名称是一定要有的。
motion
sudo apt-get install motion
首先将 motion 软件的后台进程改为开启,让它能够一直在后台运行。输入以下命令,将文件中 start_motion_daemon=no 的 no 改为 yes。
sudo nano /etc/default/motion
之后输入命令打开 motion 的配置文件:
sudo nano /etc/motion/motion.conf
daemon on  #off改成on
width 640
height 480 #根据摄像头像素自行更改
framerate 50 #帧率
stream_maxrate 200
stream_localhost off    #设为off
sudo killall -TERM motion
sudo motion
接着就可以在http://<本机ip>:8081看到你的视频流了
opencv
import cv2

def test_open_cam():
    connected_cam = []
    for port in range(0, 20):
        try:
            cam = cv2.VideoCapture(port)
            if cam.isOpened():
                connected_cam.append(port)
            cam.release()
            cv2.destroyAllWindows()
        except:
            cam.release()
            cv2.destroyAllWindows()
    print(f'=> list of found cameras: {connected_cam}')
    return(connected_cam)

test_open_cam()
[ WARN:0] VIDEOIO(V4L2:/dev/video16): can't open camera by index
[ WARN:0] VIDEOIO(V4L2:/dev/video17): can't open camera by index
[ WARN:0] VIDEOIO(V4L2:/dev/video18): can't open camera by index
[ WARN:0] VIDEOIO(V4L2:/dev/video19): can't open camera by index
=> list of found cameras: [0, 14, 15]
import cv2
cap = cv2.VideoCapture(0) # 打开摄像头
if not cap.isOpened(): # 检查摄像头是否成功打开
    print("无法打开摄像头")
    exit()

cap.set(cv2.CAP_PROP_FRAME_WIDTH, 640) # 设置摄像头分辨率
cap.set(cv2.CAP_PROP_FRAME_HEIGHT, 480)
ret, frame = cap.read() # 读取一帧图像

if not ret:
    print("无法读取图像") # 检查是否成功读取图像
    exit()

cv2.imwrite("photo.jpg", frame) # 保存图像
cap.release() # 释放摄像头
import numpy as np
import cv2

cap = cv2.VideoCapture(0)
cap.set(3,640) # set Width
cap.set(4,480) # set Height

while(True):
    ret, frame = cap.read()
    frame = cv2.flip(frame, -1) # Flip camera vertically
    gray = cv2.cvtColor(frame, cv2.COLOR_BGR2GRAY)

    cv2.imshow('frame', frame)
    cv2.imshow('gray', gray)

    k = cv2.waitKey(30) & 0xff
    if k == 27: # press 'ESC' to quit
        break

cap.release()
cv2.destroyAllWindows()
遇到问题 
SD 卡故障排除 
- 确保不要使用劣质的 SD
- 检查电源供电是否满足要求。全速运行时,如果电压低于 4.75V 会导致系统不稳定
- 检查供电 USB 线,不要使用劣质线,也不要使用太长的供电线,以免由于线路损失导致供电不足
断电前确保运行
sudo halt关闭系统 - 超频也可以导致一些问题
无法进入图形界面 
树莓派开机黑屏只有光标无法进入图形界面桌面 _ 树莓派开机后一直进不去系统 -CSDN 博客
Warning: Ignoring XDG_SESSION_TYPE=wayland on Gnome. Use QT_QPA_PLATFORM=wayland to run on Wayland anyway.
sudo vim /etc/gdm3/custom.conf
/ ,寻找 #WaylandEnable=false
将#删除,重启系统